Showing posts with label tutorial. Show all posts

Friday, 13 February 2015

GUESTPOST @LaaLaaMonroe | ValentinesDay ♥ Dramatic Cut-Crease Tutorial


Hey loves, I just want to Shanna for letting me come through and do this guest post on her blog *adore you mama* I'm LaaLaa you may or may not already know me. Been loitering in the community for nearly 7 years over at DolceVanity.com. My blog has more of a variety than just beauty, it's all about my life-style.
Valentine's is approaching and if you'd like to try something a little bit more dramatic and have a play on the eyes. I've got a quick tutorial for you. In under 10 steps you can create this look and you know what even if you're single and just doing something with friends or want to use this for a night out, go'on. Appreciate yourself and feel good!
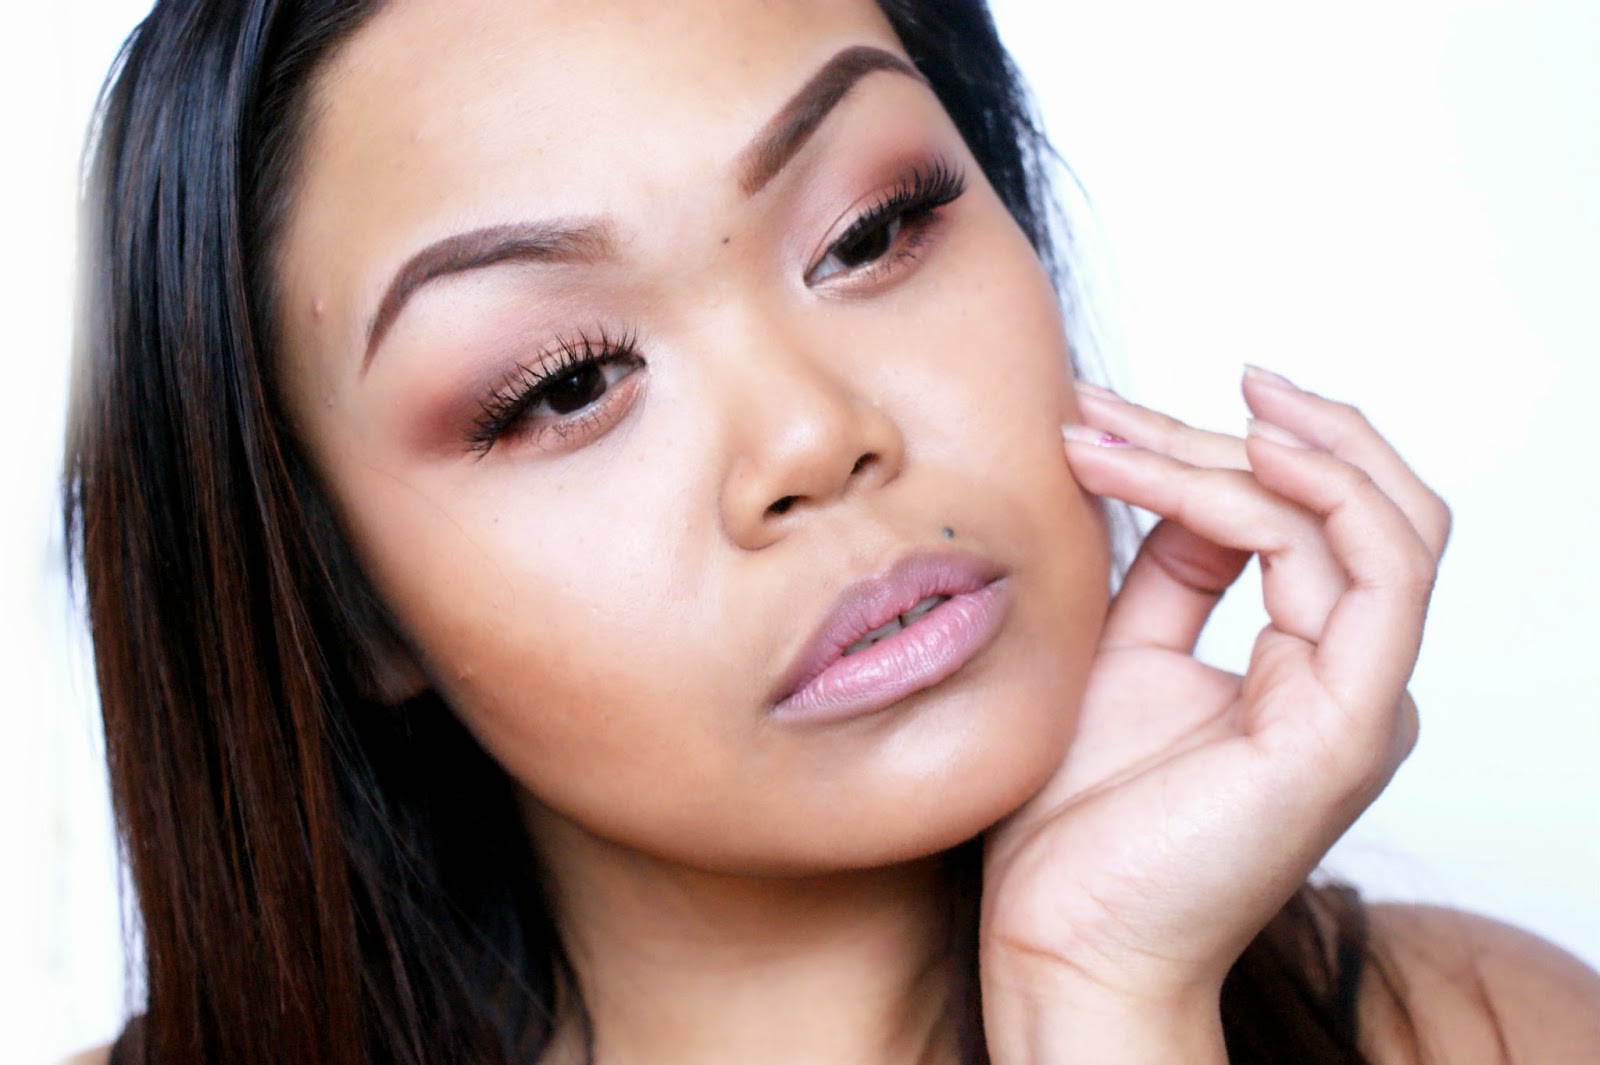
All these eyeshadows are from the Urban Decay Vice 3 Palette but...for the crease use any dark colour and then use a similar but lighter, transitioning colour to blend out.


 1. With an angled brush Map out your shape using "Bondage" (follow your own natural shape).


2. With a fluffy brush begin to defuse the sharp line we created with "Vanity" shadow.

3. Pat "Last Sin" blush onto the lid, staying underneath the crease.

4. Line the waterline using Sothys "Graphic" khol liner and smudge out using "Bondage".

5. Add your wing using Illamasqua "Precision Gel Liner" gel liner.

6. Coat lashes using Kevyn Aucoin "Volume Mascara" & add Esqido Lashes "Lashlorette".

7. Line lips using L'Oreal Contour Parfait Lip pencil "Honey", fill them in with L'Oreal Collection Privee The Perfect Nudes "JLO", added gloss using Makeup Revolution Salvation Velvet Lip Lacquer "What I Believe".


 Whatever you are doing for this occasion, have a good weekend and y'all beautiful even if a man doesn't tell you - I am!

@LaaLaaMonroe | DolceVanity Blog

Thursday, 12 February 2015

GUESTPOST @ChocandLipstick | Valentines Day ♥ Pinks, Reds and Shimmers Makeup Tutorial

Even though Valentines is supposed to be a time for lovers; this woman and her husband have no time together due to our two young kids. This year we were lucky enough to have Valentines day fall on a Saturday, and we actually have something planned. Though my husband does work on a Saturday, it means when I get ready, the kids are around andI have to do my makeup with young ones pulling me in all directions. Therefore my makeup has to be quick, easy and yet lovely. This Valentines tutorial is all of that. Simple, quick, and definitely effective.


1: First you will need to prep and prime your eyes. I used MAC prolongwear concealer as it neutralizes my eye colour and has a built in eye primer, a great multitasker. Then I set my concealar with GOSH Velvet Touch Prime 'n Set powder using my Real Techinques Setting Powder Brush. Not only does this set the concealer but it also aids in blending my darker shades.
2: Using my Zoeva 231 Luxe Petit Crease brush with Makeup Geek's Bitten, I traced my crease with the eyeshadow and the lightly blended with my Zoeva 227 Luxe Soft Definer.
3: Using my Zoeva 230 Luxe Pencil with Makeup Geek's Corrupt and lined my crease once more, blending with the same Zoeva 227 Luxe Soft Definer brush.
4: Using Bdellium Tools 755 with Makeup Revolution's Awesome Eyeshadow and Eyebrow Palette in Make Believe, I used the shimmery wine shade on the right, four down, and shaded in the outer half of the eye, blending with Bdellium 785 Tapered Blending brush.
5: Using Teez Natural Shader with Makeup Revolution's Awesome Eyeshadow and Eyebrow Palette in Make Believe, I used the frosted pink on the left, first shade, and filled in the remainder of my lid (inner corner), blending with the Bdellium 785 Tapered Blending Brush, blending up, and gently with the wine shade.
6: Using my Zoeva 231 Luxe Petit Crease, the without adding additional product (Bitten) to the brush, I swept the brush underneath the bottom of my lashes, moving the brush back and forth to appear slightly smoky.
7: Using Bareminerals Waterproof Eyeliner in Black, I lined my waterline and tightline.
8: Next I applied a black mascara to both the top and bottom lashes. As we are applying false lashes, any basic mascara will do, but do not over apply.
9: Using my Zoeva 317 Wing Liner brush, and L'Oreal Eyestudio Lasting Drama Gel Liner in Black, I created a wing spanning the entire length of the eyeshadow.
10: Finally, I used my Revlon Eyelash Adhesive with my Red Cherry Lashes in 218 and applied the false lashes close to my lash line. The particular lashes were used to accentuate the winged liner, and create a natural flirty lash look.
And that's it!
This Valentines look has bold and dramatic colour, but the great thing about it is that you can either wear a natural shade, clear glossy lips (like I did), or you could go with a bold shade of lipstick to match Bitten. Any of these choices will look amazing; just go with whatever you are comfortable with.


I hope you all have a wonderful Valentine's day!

Wednesday, 11 February 2015

TUTORIAL | Valntines Day ♥ SIMPLE ROSE GOLD EYES


A light Valentines Day look for a laid back chillaxing day with your loved one. Maybe a lunch date? A little trip to the cinema? Or maybe just watching a good ol' tear-jerker on Netflix. Whatever you'll be doing for Valentines Day, here's a natural, day-time look with colors that consists of warm browns, rose golds and a dewy, light-weight skin finish.


Products Used

Makeup Geek Eyeshadows
Frappe
Cosmopolitan
Cococa Bear
Mango Tango
MAC Angel (Frost)
YSL Touche Eclat Foundation 
SLEEK Contour Kit in Medium
Rimmel Brow Pencil in Darkest Brown
MAC Studio Sculpt concealer in NC 42
LA Girl Pro Concealer in Cool Tan
EBAY Lashes
LA COLORS Lip Liner in Cappuccino 


Start off with a transition shade that will allow your eye shadow to blend out seamlessly with MUG Eyeshaodw in Frappe

Pack on MUG Eyeshadow in Cosmopolitan on your lid with a patting motion for a bold color rather than swept

Deepen your crease with MUG Eyeshadow in Cocoa Bear

Blend the crease even more and blow it out with MUG Eyeshadow in Mango Tango and utilize the shade on your outer lower lash line.

Add a highlight onto your brow bone, inner-lower lash line and inner-eye corner for an extra pop of glam, this will allow your eyes to appear brighter. I used the highlight shade in the SLEEK Contour Kit.

Add your favourite mascara onto your top and bottom lashes (falsies optional)


Tuesday, 10 February 2015

GUESTPOST @ColourUBold | Valentines Day ♥ Barbies Eyes and Kissable Lips


I love Valentines not because I always have a valentine but because I can experiement with my makeup! Purples and Pinks are always fun to experiment with so with this look thats what I did! Yes we could go with a cat eye and red lips but this look right here will get you a valentines before the end of the night! Please check my blog out at ColourUBold if you enjoyed my tutorial.


Step by Step: Starting at the top left!


Step 1: Prime those Lids

I used a purple cream base to really give my pinks and purple and added pop! You can also use a pink or even white cream base!

Step 2: Darken that outer V
Use a deep purple and deep fushia color to add diminsion to the eye on the outer part of your eye and pull it up into the crease. Use those colors and place it on the lower lash bringing it inward half way.

Step 3: Highlight Galore
With the same light pink shade used on the lid put it on the browbone and inner corners of the eye and also down to the lower lashes half way until you reach the dark purple colors.

Step 4:  Blend like a boss
Blend all colors together so that they all transition well together making it look like a gradient effect.

Step 5: Wing it out! 
Create a big or little wing liner look!

Step 6: Darken the Water line
With a dark purple eyeliner line the water line from the outer corner of the lower lash line inward. You can also smudge it out on the outer corners to create a little bit of a smokey effect.

Step 7: Lash it out!
I used some false lashes to create a more volumized look but you really can just coat on a ton of mascara to get the same effect! Also don't forget that lower lash to really create the perfect look!

Step 8: Blushing Beauty
Using a light pink for lighter skins or a deep pink for dark skin to create a nice flush of color without going overboard!

Step 9:  Kissable Lips
I neve wear pink on my lips but this valentines I'm taking my makeup game up a notch! Use a pink lip liner darker than the lipstick that you will be putting on. This will add diminish  then use a frosty bright pink to cover the inside of the liner. Press lips together for a gradient effect and top it off with your fave pink lipgloss.!


Monday, 9 February 2015

GUESTPOST @Natalesm | Valentines Day ♥ Lunch Date Makeup

Valentine's Day is coming up! I haven't done a proper Valentine's Day date in about two years... but I'm quite excited for this year. I'm going for a lunch date :D
For a lunch date, your makeup should be simple and natural. You want to look sweet and full of energy, not bogged down with lots of heavy makeup! This look is very sweet and perfect for younger girls as well.


Here I'm using BB cream as a light concealer. Use it to cover any dark circles or blemishes.
Displaying Base.jpg

Instead of a heavy liquid base, I decided to go for a light coat of powder. Feel free to wear liquid base if you'd like, but I think powder is better for daytime and keeps you from getting shiny. 

This may be a day look, but that doesn't mean you can't have cheekbones. Using a powder a few shades darker than your actual skin tone (think your darkest natural tan colour), contour lightly. 

After applying an eyeshadow primer, use a neutral-pink from the lash-line to just above the crease of your eye. You want to get rid of shininess and add a little bit of colour. 

Tight-line your upper lash line, then apply a thin layer of eyeliner. Drag the outer corner of the top line down, then tight-line the outer half of the bottom of your eye. Connect the two lines and blend for a cute, puppy like effect. Then apply lots of mascara for flirty, sweet eyes perfect for a nice date. 

Apply a nice pink blush on the apples of your cheeks! I'm using a super bright pink, but feel free to go more natural if you'd like. I think the light pink adds a sweet feel to the overall look. 

At last, apply a cute pink lipstick! Don't go for anything too dark at the moment-- you can darken up your makeup later. This colour is called Syrup by MAC, and I'm definitely a fan. Arrange your hair and you're on your way for the perfect lunch date!


Twitter: @Natalesm
Instagram: natalie.mei
Facebook: https://www.facebook.com/pages/Natillie/327933654054401